How to Pack the Perfect Picnic
A Guide to Foods That Hold Up, What to Skip, and Smart Cooler Tricks
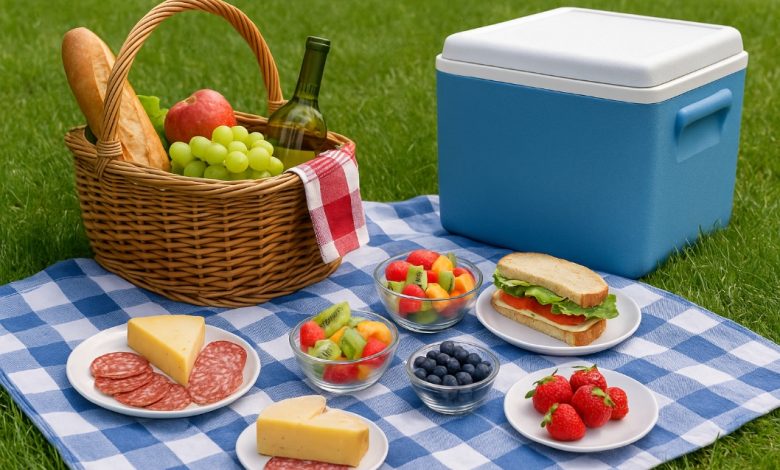
How to Pack the Perfect Picnic : A Guide to Foods That Hold Up, What to Skip, and Smart Cooler Tricks
Master the art of outdoor dining! Our ultimate guide on how to pack the perfect picnic covers fail-safe foods, what to avoid, and genius cooler hacks for a fresh, delicious, and stress-free experience.
Introduction: The Art and Joy of the Perfect Picnic
There is a special kind of magic in a picnic. It’s more than just a meal outdoors; it’s an experience—a deliberate pause to enjoy good food, beautiful surroundings, and the company of loved ones. But the difference between a idyllic feast and a disappointing, sun-wilted mess often comes down to one thing: preparation. The secret to a truly successful outing lies in knowing how to pack the perfect picnic.
This isn’t just about throwing sandwiches and a blanket into a basket. It’s a thoughtful process of selecting foods that hold up without refrigeration, avoiding culinary pitfalls, and mastering the science of your cooler to ensure everything arrives as fresh and delicious as when it was packed. A perfect picnic is a symphony of practicality and pleasure, where the logistics fade away, leaving only the joy of the moment.
This guide is your comprehensive manual to achieving picnic perfection. We will delve into the best and worst foods for your hamper, provide innovative cooler packing tricks, and offer tips to elevate your entire experience. Whether you’re planning a romantic sunset dinner, a lively family gathering, or a solo retreat into nature, these principles will ensure your outdoor meal is unforgettable for all the right reasons. Let’s transform your next al fresco adventure into a seamless, delicious success.
The Foundation: Planning and Packing Your Picnic Basket
Before we dive into the food, a successful picnic begins with a solid foundation. A little forethought ensures you’re prepared for comfort, convenience, and any little surprises along the way.
The Essential Non-Food Checklist:
-
Insulated Cooler or Bag: This is non-negotiable for food safety and quality. Size it appropriately for your group and meal.
-
Reusable Ice Packs: More effective and less messy than ice cubes.
-
Blanket or Rug: Choose one that’s durable, moisture-resistant, and large enough for your party to sprawl out.
-
Plates, Utensils, and Napkins: Opt for reusable or compostable options to be eco-friendly.
-
Cups and a Corkscrew/Bottle Opener: Don’t get caught with a sealed bottle and no way to open it!
-
Sharp Knife and Small Cutting Board: For last-minute slicing and serving.
-
Trash Bag: Leave no trace. Pack out everything you bring in.
-
Hand Sanitizer or Wet Wipes: Essential for cleaning hands before and after eating.
-
Sunscreen and Bug Spray: Because comfort is key.
-
Extra Containers: For leftovers or any packaging you need to take home.
The Stars of the Show: Foods That Hold Up Perfectly
The hallmark of a well-packed picnic is food that actually tastes great after traveling. You need dishes that are robust, resistant to wilting, and taste good at room temperature.
1. Hearty Grains and Pastas: The Substantial Base
Grain-based salads are the undisputed champions of the picnic basket. They are forgiving, flavorful, and get better as they marinate.
-
Why they work: Grains like farro, quinoa, couscous, and orzo don’t get soggy. They absorb dressing beautifully and provide a sturdy base for other ingredients.
-
Perfect Picnic Recipes:
-
Farro Salad with Roasted Vegetables: Farro’s chewy texture holds up impeccably. Toss it with roasted carrots, zucchini, and bell peppers in a lemony vinaigrette.
-
Quinoa Salad with Black Beans and Corn: A protein-packed, colorful option with a lime-cilantro dressing.
-
Couscous with Dried Fruits and Nuts: A sweet and savory option that requires no chopping and is ready in minutes.
-
2. Durable Proteins: Keeping You Satisfied
Including protein ensures your meal is filling and energizing.
-
Why they work: Choose proteins that are cooked and can be served cold without sacrificing texture or flavor.
-
Perfect Picnic Picks:
-
Grilled Chicken Breasts or Thighs: Season well, grill, and slice. They are excellent in salads or on their own.
-
Hard Cheeses: Cheddar, Manchego, Gouda, and Parmesan are excellent choices. They are firm, not overly oily, and won’t melt. Avoid soft cheeses like brie or camembert if you can’t keep them consistently cool.
-
Canned Tuna or Salmon: Pack a can opener and mix it on-site with a pre-portioned mayo or olive oil packet for a fresh sandwich filling.
-
Hard-Boiled Eggs: A classic for a reason. Peel them at home for ultimate convenience.
-
Chickpeas and Lentils: Fantastic in salads, they provide plant-based protein and fiber.
-
3. Robust Vegetables and Fruits: The Crunch Factor
Fresh produce is essential, but you must choose varieties that can handle the journey.
-
Why they work: Dense, low-moisture vegetables and sturdy fruits are your best allies. They add crunch, color, and freshness without turning into a soggy mess.
-
Perfect Picnic Picks:
-
Vegetables: Whole cherry tomatoes, snap peas, baby carrots, radishes, cucumber slices, and blanched asparagus or green beans.
-
Fruits: Whole apples, firm pears, oranges, grapes, berries (if handled gently and eaten first), and stone fruits like peaches and plums (if firm).
-
4. Indestructible Breads and Wraps: The Vehicle for Flavor
The right carb can make or break a sandwich.
-
Why they work: You need bread with structure—something that won’t get crushed or become gluey.
-
Perfect Picnic Picks:
-
Baguettes: A classic. Rip and tear on-site for a rustic feel.
-
Ciabatta Rolls: Sturdy and perfect for individual sandwiches.
-
Pita Pockets: Their pocket design contains fillings beautifully.
-
Tortilla Wraps: Ideal for roll-ups. Just be sure to wrap them tightly to prevent unrolling.
-
Crackers: A fantastic alternative to bread for cheeses and spreads.
-
The Saboteurs: What to Skip on Your Picnic
Knowing what to avoid is just as important as knowing what to pack. These foods are high-risk for spoilage, mess, or disappointment.
-
Mayonnaise-Based Salads: This is the golden rule. Potato salad, coleslaw, and chicken salad made with mayo are breeding grounds for bacteria if they fall into the “temperature danger zone” (40°F – 140°F). Alternative: Use vinegar-based dressings or pack the mayo separately and mix on-site.
-
Delicate Greens: Arugula and leaf lettuce wilt almost instantly. Alternative: Use sturdier greens like kale, spinach, or cabbage as a base for salads, or pack dressings separately.
-
Raw Meats for Grilling: Unless you have a dedicated, secure cooler and a firm plan to cook immediately, this is a food safety nightmare. Stick to pre-cooked meats.
-
Overly Ripe or Juicy Fruits: Watermelon, while refreshing, is a leaky mess. Alternative: Pre-cut and pack it in a separate, airtight container at the very top of the cooler.
-
Chocolate and Gooey Treats: Unless it’s a cool day, you’ll likely end up with a melted disaster.
-
Anything That Requires Complex Assembly: Avoid dishes with many components that need to be combined at the last minute. Keep it simple.
Master Your Cooler: Smart Tricks for Maximum Cold and Efficiency
Your cooler is your picnic’s best friend. Packing it correctly is a science that ensures food safety and quality.
The Science of Packing:
-
Start Cold, Stay Cold: Chill your cooler and all its contents (including drinks) for at least a few hours before packing. A warm cooler will melt your ice packs rapidly as they work to bring the temperature down.
-
The Two-Cooler Rule: For a large group, consider one cooler for drinks and one for food. The drink cooler is opened frequently, letting cold air escape and warming the contents of the food cooler.
-
The Layer Method:
-
Bottom Layer: Place your largest, strongest ice packs on the bottom.
-
Middle Layer: Pack your perishable food items here—meats, cheeses, salads, etc. Group similar items together.
-
Top Layer: Add another layer of ice packs. Cold air sinks, so you want to trap the food between cold sources.
-
-
Fill the Air Gaps: A full cooler stays cold longer than a half-empty one. If you have extra space, use smaller ice packs, frozen water bottles, or even extra drinks to take up the empty airspace. This prevents cold air from circulating out and warm air from circulating in when opened.
-
The “Last In, First Out” Rule: Pack items in reverse order of use. The things you need first (e.g., drinks, snacks) should be on top. The items for later (e.g., your main course) should be buried deeper where it’s coldest.
Pro Cooler Tricks:
-
Freeze Your Drinks: Use water bottles, juice boxes, or sports drinks as additional ice packs. They will thaw throughout the day, providing a cold drink when you’re ready for them.
-
Pre-Salt Your Ice: If you must use loose ice, add salt to it. Salt lowers the freezing point of water, allowing the ice to get even colder and last longer.
-
Keep it in the Shade: Once you arrive, place your cooler in the shadiest spot possible and keep the lid closed as much as you can.
Putting It All Together: A Sample Perfect Picnic Menu
For a Romantic Couple:
-
Main: Ciabatta rolls with grilled chicken, pesto, and roasted red peppers.
-
Sides: Quinoa salad with lemon vinaigrette, and a container of cherry tomatoes and snap peas.
-
Dessert: Dark chocolate-dipped strawberries (packed carefully on top).
-
Drink: Chilled rosé or sparkling water.
For a Family of Four:
-
Main: “Deconstructed Sandwich” platter: sliced baguette, sliced turkey, cheddar cheese, lettuce, tomato, and mustard/mayo packets for DIY assembly.
-
Sides: Farro salad and apple slices.
-
Dessert: Oatmeal raisin cookies.
-
Drink: Frozen water bottles and juice boxes.
Frequently Asked Questions (FAQ)
Q: How long can food safely stay in a cooler?
A: It depends on the quality of your cooler, the outside temperature, and how well you packed it. A well-packed cooler should keep food safely cold (below 40°F or 4°C) for 4-6 hours. In very hot weather, err on the side of caution and aim for less.
Q: What’s a good alternative to a traditional picnic blanket?
A: A waterproof-backed beach mat or a moving blanket (the kind used to protect furniture) is excellent. They are more resistant to damp ground and easier to shake clean.
Q: I don’t have ice packs. What can I use instead?
A: Frozen water bottles are the best substitute. You can also freeze sponge-like items (like a damp sponge or a loaf of bread) in a sealed plastic bag, but water bottles are most effective.
Q: How can I keep insects away from our food?
A: Keep food covered until you’re ready to eat. Use mesh food tents or simply place another layer of cheesecloth or a clean tea towel over serving dishes. Citronella candles can also help create a bug-free zone.
Conclusion: Your Blueprint for Picnic Perfection
Mastering how to pack the perfect picnic is a skill that pays dividends in pure, simple enjoyment. It’s about making smart choices—opting for foods that hold up like grain salads and sturdy vegetables, avoiding the pitfalls of mayo and delicate greens, and employing smart cooler tricks to keep everything fresh and safe.
With this guide, you’re equipped to move beyond basic sandwiches and step into the world of effortless, elegant outdoor dining. So, grab your blanket, pack your hamper with confidence, and go create those perfect, sun-dappled memories. The great outdoors is waiting, and it’s never tasted so good.